Hey hey! It’s week four of the One Room Challenge, and we’re talking about the TV. Last week I left you hangin’…our projector plan was out the window, and I was left to figure out where the TV should go in our narrow living room. If this weren’t the main TV viewing space in our home, it wouldn’t be such a big deal, but this room serves as our often used, most visible space for hosting, holiday-celebrating, lounging, and TV viewing.
Wherein I Eat My Words
For years I’ve been anti TV-over-the-mantel for a multitude of reasons. I have a real hard time relinquishing the natural focal point of a space (the fireplace/mantel) to a large black rectangle. But, over our mantel seemed to be the only place in our room that made sense. It was also the only place in the room I had not yet tried.
Creative people have come up with lots of ways to disguise or hide a TV (painting the surrounding wall black, covering the TV with a painting (or barn doors or a vintage pull-down map), etc etc. TVs have also gotten slimmer and more streamlined over the years. I first heard about Samsung’s Frame TV years ago, and was immediately fascinated by the concept. A TV that instantly turns into art when not in use? Maybe I could wrap my head around that. I taped off the size of a TV to get a sense of scale.

The Splurge
I started to consider splurging on a Frame and trying it over our mantel. Price comparing and research commenced, and we decided to order one from Walmart. Pricing was pretty darn consistent across all vendors [though Black Friday and pre-Superbowl are when the prices are lowest, FYI], but Walmart (technically it was sold and shipped by Beach Camera) offered a free extra frame “bezel” in my choice of finishes. These extra frames snap onto the TV and are held by magnets. They offer an alternative look to the simple black frame that is standard on these TVs. The extra frames themselves retail for around $200, so this felt like a deal. Plus, by purchasing through Walmart, I could return the TV in-store if this all didn’t work out.
The TV came quickly, and installation was pretty darn easy! I have to say, the picture and sound quality of this TV are FAR superior to the mediocre TVs we’ve had in the past.
[Quick note to say NO items here were sponsored. We paid cold hard cash for everything in this room. Links I share are affiliate links, so if you do happen to make a purchase through a link, a few pennies of that purchase will come to me.]

Sidenote: how fun is LEGO Masters?! It’s definitely been our family favorite Covid viewing choice. Also, notice the dingy looking firebox which had just been scrubbed before this pic was taken. Keep reading for more on that eyesore.
Considering a TV Stand
After having our TV on an 20″ tall media console for years, this felt SO high, at around 50″ off the floor. Over the first few days we had it installed, I questioned my decision and started considering TV stand options, which would allow the TV to be lower and just to the left of the fireplace.
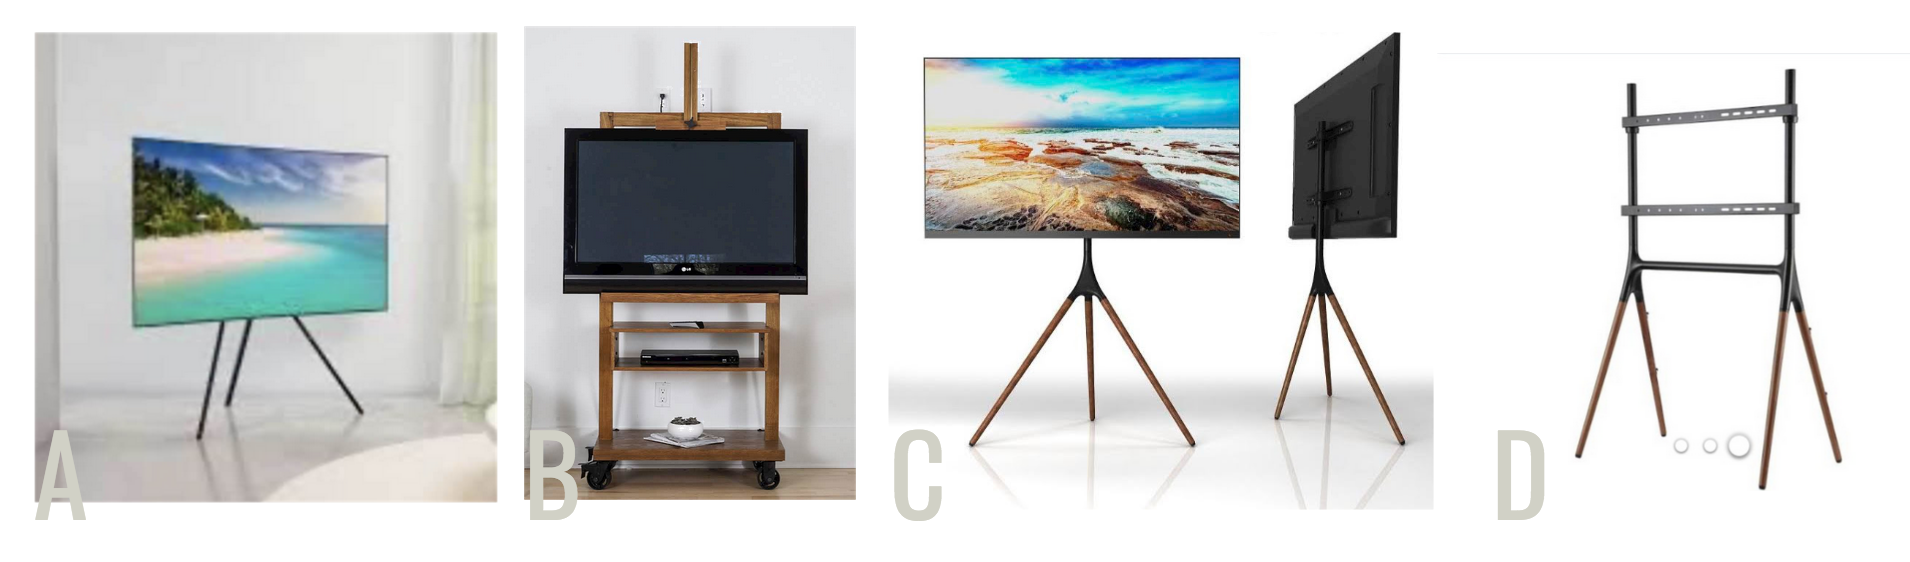
Option A is the Samsung Frame brand stand. It’s quiiiite expensive, and wasn’t really an option. I did a bit of digging and found these other, much less expensive, options. I love that Option B looks and feels like a bit like an artists’ easel. Can you envision it with the Frame in art mode? Yes, please. Option C and D were possibilities, as well.
The reality, though, was that we didn’t really have the space for these stands. They would occupy too much floor space in a high-traffic area, and in a home with young kids and a big dog, it just wasn’t practical for us.
What was left to do, but to lean into our new, very nice, TV-over-the-mantel?
Hiding the Cable
We thoroughly considered hiding the single cable that extends from this TV in the wall, but for myriad reasons, we elected not to do so. Instead, I ordered two packs of these narrow, paintable cord covers. The “One Connect” box that comes with the TV would be hidden in the new built-ins, so the cord needed to reach there. Wouldn’t you know, the standard cord wasn’t long enough, so I also ordered a longer cord. That Samsung gets you at every turn!
Rather than utilize the bulky connectors and corner pieces that came with the cord cover, I simply cut strategic holes along the route. Below you can see the under side of the cord covers. The cords fit into these tracks, then a smooth, paintable cover snaps on top. You’ll see the “finished” look down at the end of this post. The TV offers the option for the cord to drop down from the center of the TV, or off to the left. I opted for the off-center option, knowing I could more easily style items on the edges to obscure the cord cover.

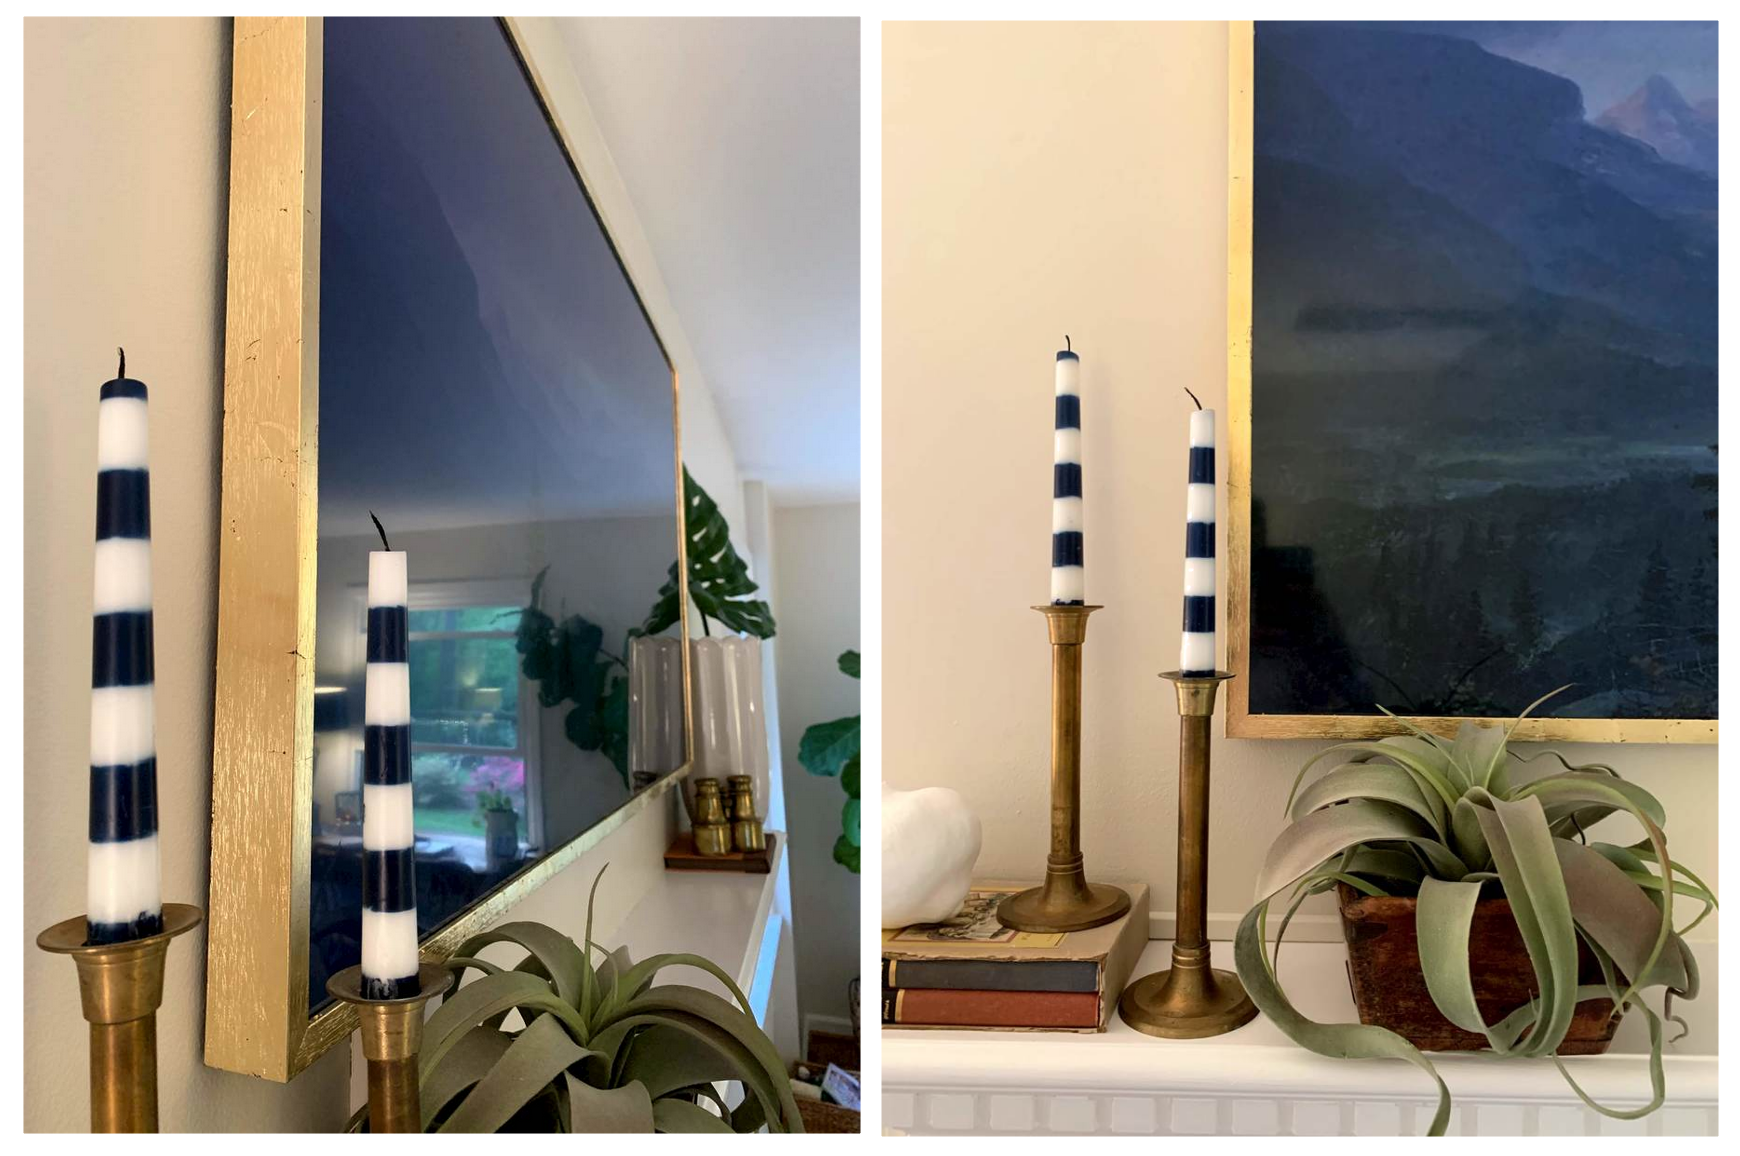
Gold Leaf Frame
I had some DIY plans for the extra “bezel” we got with the TV. With brass as an accent finish in this room, I wondered if I could create a brass-like frame for the TV. Spray paint is definitely an option, but I ultimately decided to try gold leaf. The irregular, more authentic look of gold leaf appeals to me. I ordered these sheets and this adhesive, and got to work on the frame. I won’t go into great detail, but it’s a simple enough project. You simply paint on the adhesive, then allow it to dry. When dry, it has a tacky feel, and when you lay down a sheet of the gold leaf, it grabs it easily. Then, you simply use a dry paintbrush to press the leaf fully into the adhesive.

Be sure to let go of any perfectionist tendencies if you attempt this…it’s almost impossible to get things “perfect”, but it’s those irregularities that I personally love. The gold leaf is so very thin, the faux wood grain from the plastic frame shows through. I am in love with the results!

Digital Art Options
The TV includes a handful of art images to choose from, and Samsung offers lots of other art for an additional fee. Of course, you can also upload your own images for display. These could be family photos, or digital art you have purchased or downloaded yourself.
You’ll find lots of open source digital art available online, as long as you are using the images for personal use. The Metropolitan Museum of Art has a vast collection. Under Open Access Art, I narrowed my search to paintings. You can narrow further by location, era, or department. I then skimmed through, looking for horizontal paintings. I have found that images with lots of dark hues look most realistic on the Frame.
Still Life: Flowers and Fruit by Severin Roesen is one of my favorites. To download it, click to open the image fully. Then, right click and “download image.”
 Next, you want to be sure to prepare the image properly for the Frame TV display. I have found that it’s imperative the image size has a minimum width of 3460 pixels for our 55″ TV. And, the proportions must be 9:16. I may put together a more in-depth blog post showing more specifics on how to achieve this. This post is already far too long. Would that be helpful?
Once the image is the right size and proportion, you can upload it to the TV via the Smart Things app.
Here are some other favorites I’ve found at the Met, all at no cost.

There’s also a good selection of digital mat options you can apply to any art. Depending on the time of day and light in the room, these can be a quick give-away, looking quite fake in my opinion.
The Firebox
The final step to spruce up this spot in the room was to paint the inside of the firebox. Would you believe, when we purchased the home, a fire had never been lit in this fireplace?! Here’s the pristine box with the previous owner’s fab brass peacock screen.

We love a good crackling fire on a cold winter day, but the black soot leaves irregular patterns against the white bricks inside.
I knew I would want those white bricks painted, so I started with those first. I didn’t love the contrast of our black screen against the perimeter bricks, so I ended up painting those, too.
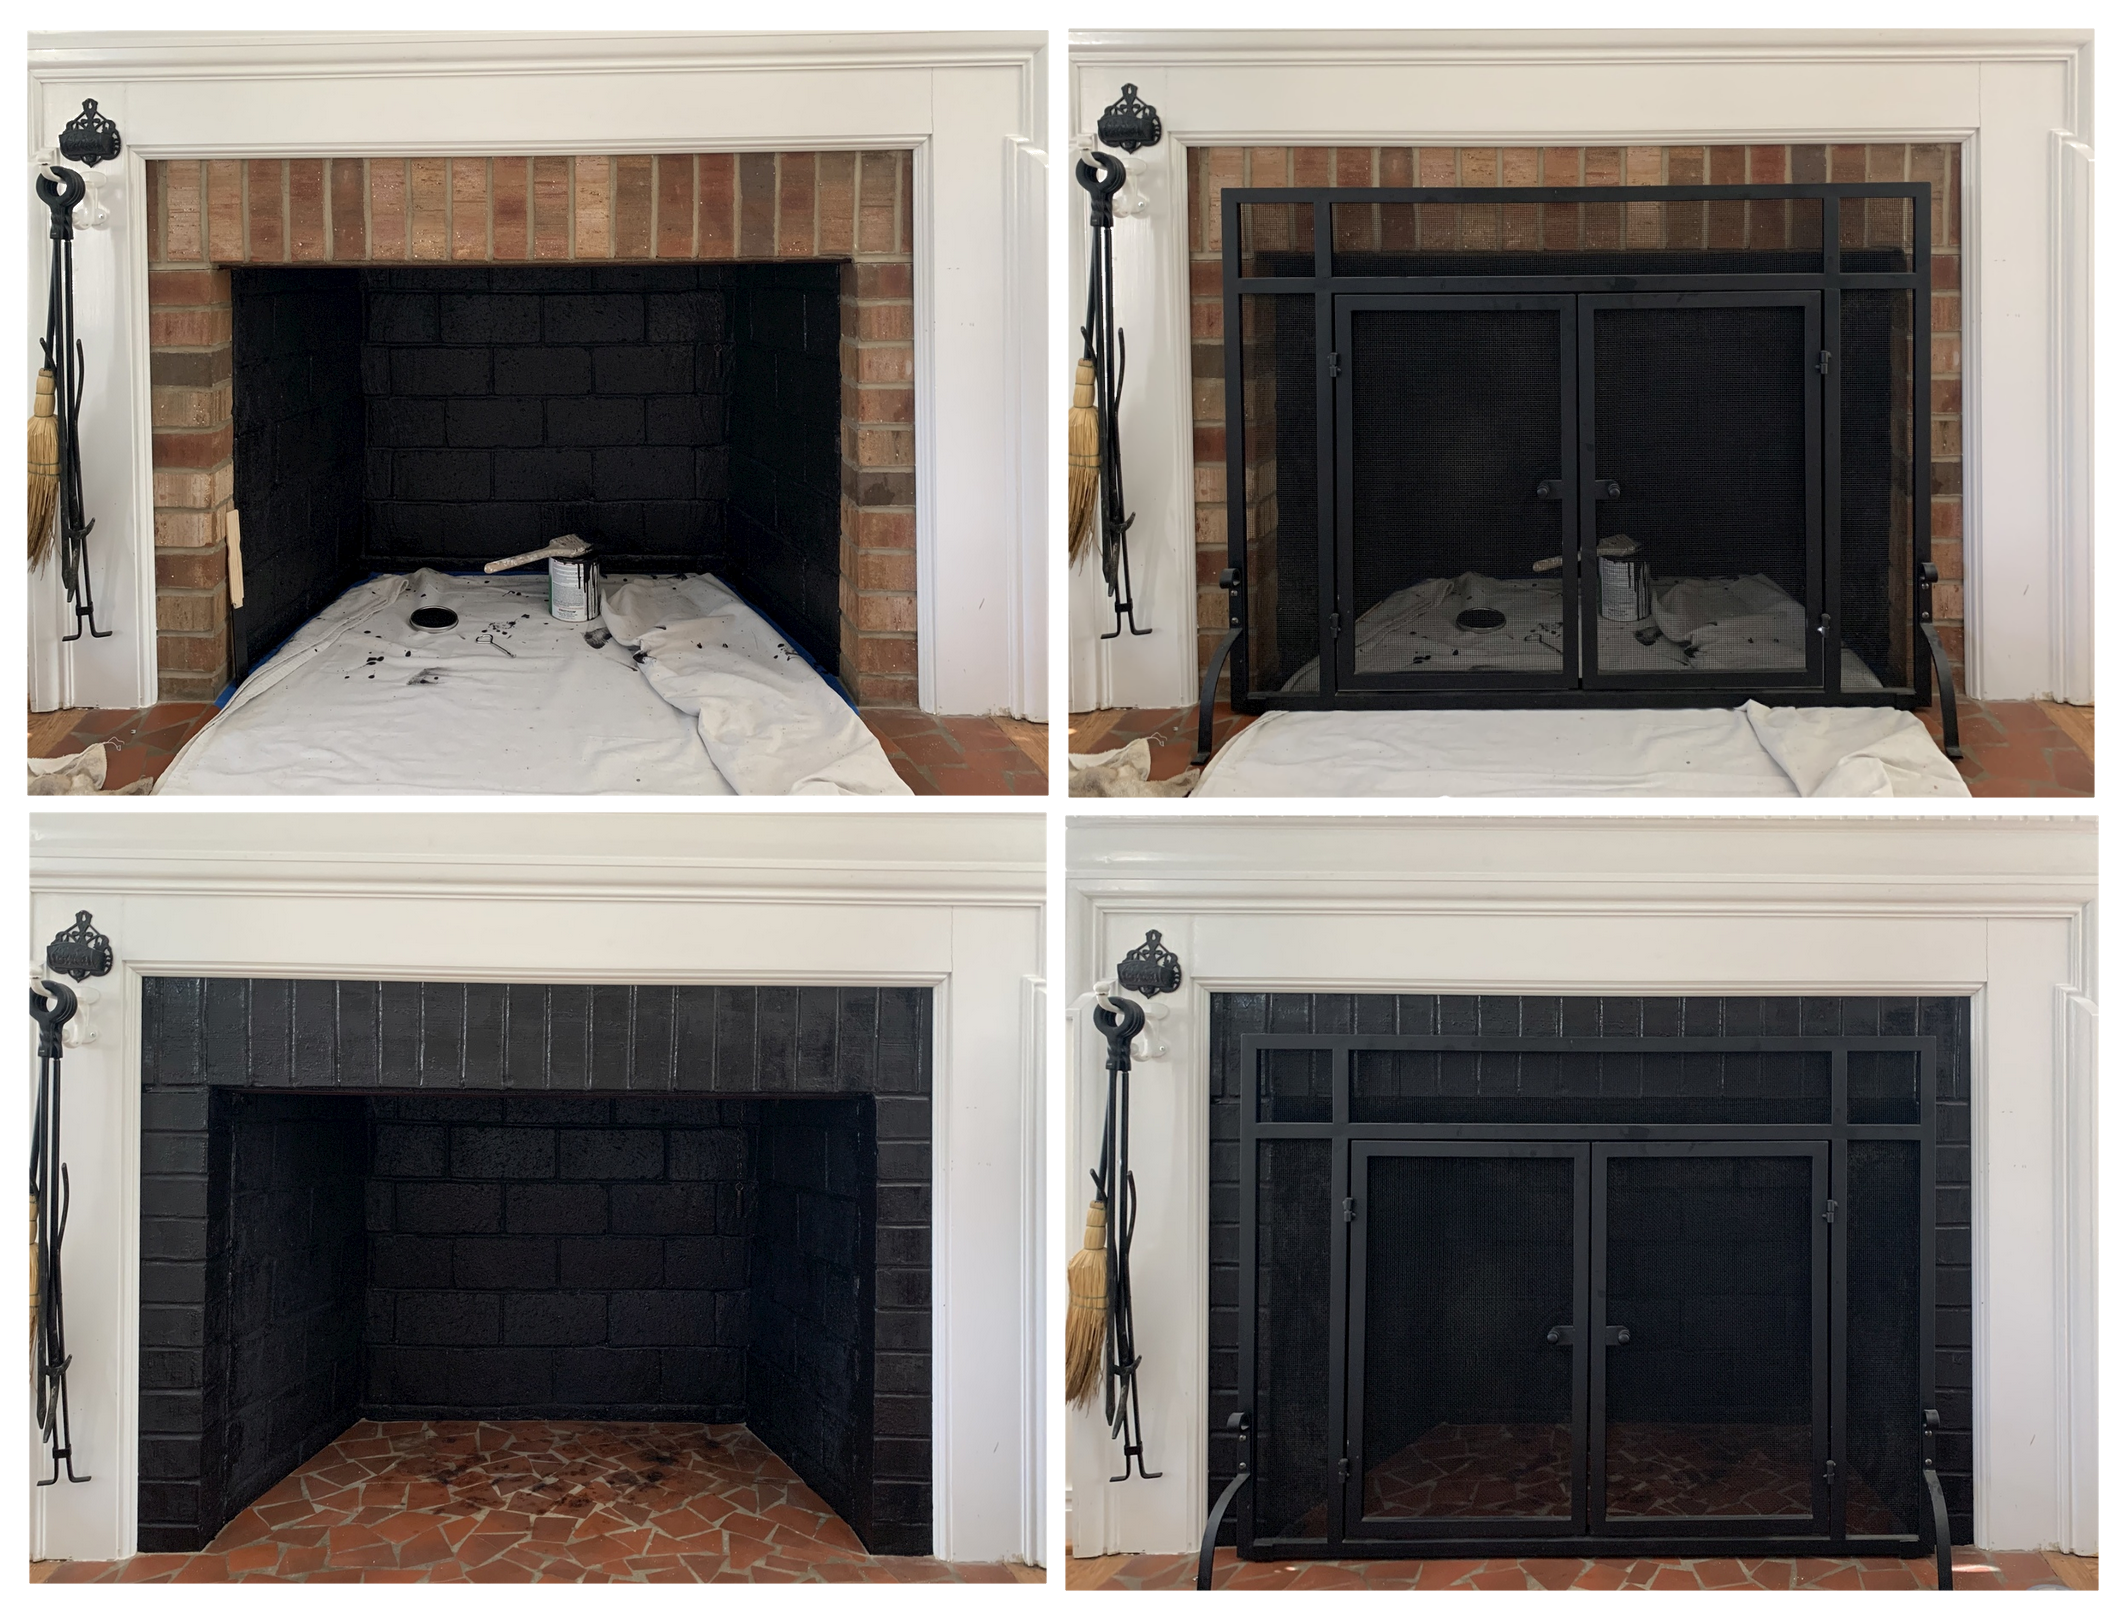
Ahhh, now it’s visually much “quieter” and more pleasing to the eye.
The End…for now
Whew. That was a lot of words and a lot of photos. Thanks for hangin’ in there! Just three more weeks of progress, then it’s the big reveal post. Can’t wait to share more with you as this room evolves!


Important Links:
The media partner for this incredibly fun and inspiring event is Better Homes and Gardens.
I am linking each week below as the challenge progresses:
My current ORC Posts: Week 1: Befores | Week 2: The Plan | Week 3: The Built-Ins | Week 4: The TV – You are here! | Week 5 | Week 6 | Week 7 | Week 8
The Guest Participant Link-ups: Week 1 |Week 2 | Week 3| Week 4 | Week 5 | Week 6 | Week 7 | Week 8
Featured Designers for May 2020:
A Glass of Bovino | Beginning in the Middle | Beth Diana Smith | Clark + Aldine | Coco & Jack | Deeply Southern Home| Design Maze | Dwell by Cheryl | Erika Ward | Home Made by Carmona | House of Hipsters | Hunted Interior | Kandrac & Kole | Kate Pearce | Katrina Blair | Liz Kamarul | Veneer Designs| Rambling Renovators | Renovation Husbands | Studio Plumb
And, if you’d like to check out my past ORCs, those posts are here:
04.18 Powder Room: Week 1 Befores | Week 2 Wallpaper | Week 3 Mirror | Week 4 Sink Skirt | Week 5 Storage | Week 6 Reveal
10.18 Master Bedroom: Week 1: The Befores | Week 2: The Plan | Week 3: The Bed | Week 4: Lighting and Art | Week 5: The Bedding | Week 6: The Reveal
04.19 Girl’s Bedroom Week 1: The Befores | Week 2: Dresser Revamp | Week 3 – The Tent | Week 4 – the DIYs | Week 5 – The Bedding and Art | Week 6 – The Reveal